Create accounts
Before you create an account, familiarize yourself with account types, capabilities, and requirements.
Choose a method
| Method | Best for | Dashboard access for the account |
|---|---|---|
| Hosted onboarding | Sending a co-branded form link that the account holder completes. The easiest option. | Yes |
| Dashboard manual entry | Entering account details yourself in the Dashboard | No |
| Onboarding Drop | Embedding a pre-built onboarding flow in your app with Moov.js | No |
| API, SDKs, and Moov.js | Building your own onboarding flow: business accounts or individual accounts | No |
Only accounts onboarded through Moov's hosted onboarding process have access to the Dashboard. If you're building your own flow, Moov strongly recommends the pre-built onboarding Drop, which keeps personally identifiable information out of your systems and includes Moov's platform agreement.
As part of the verification process, an address is required for business accounts requesting wallet, send funds, collect funds, or card issuing capabilities. The following address types cannot be the main address provided for a Moov account:
- PO Box
- Commercial mailing receiving agency
- Registered agent
Sole proprietors must be created as business accounts with businessType.soleProprietorship.
In the Dashboard
In the Dashboard, navigate to Accounts and click New account. Select Onboarding link to use Moov's hosted onboarding process, or select Manual entry to enter the account details yourself.
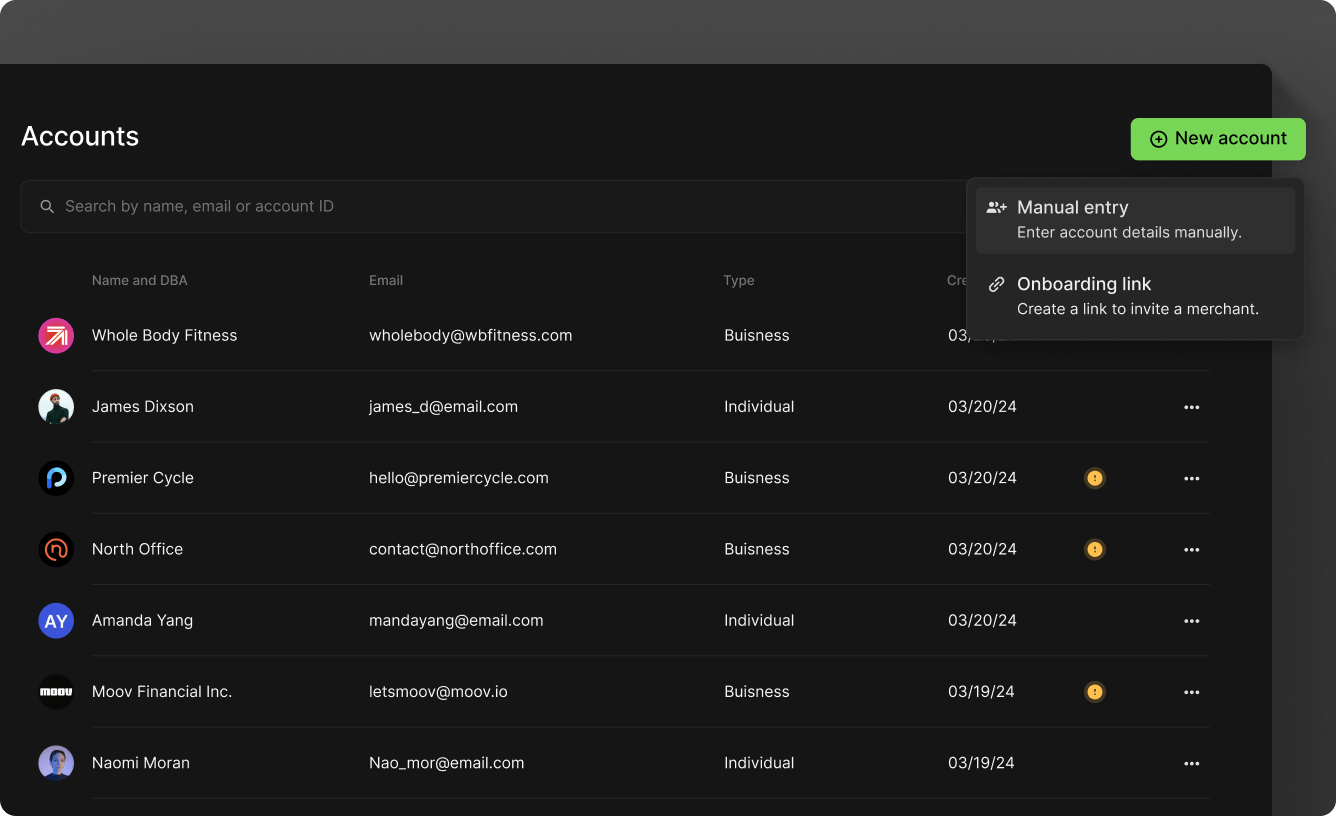
When creating an account manually, choose the account type and capabilities, then enter the profile details. For sole proprietors, choose Business type > Sole proprietorship. You can submit the required underwriting information as part of the process. See the underwriting guide for what to submit.
After the account is created, manage it from the account's page. See update and manage accounts.
With the API, SDKs, or Moov.js
Follow the step-by-step guide for the type of account you're creating. Each guide includes cURL, Go SDK, Moov.js, and onboarding Drop examples, plus a full example that creates the account in one request.
Create the account, request capabilities, send the platform agreement, and add business representatives.
Create the account, request capabilities, and send the platform agreement.
Get an access token for Drops
This step is only required if you're going to use Moov's onboarding Drop.
Create an access token, which you'll later include as the onboarding.token when onboarding accounts with Drops.
curl -X POST "https://api.moov.io/oauth2/token" \
  -u "PUBLIC_KEY:PRIVATE_KEY" \
  -H "Origin: https://your-domain.com" \
  --data '{
    "grant_type":"client_credentials",
    "client_id":"5clTR_MdVrrkgxw2",
    "client_secret":"dNC-hg7sVm22jc3g_Eogtyu0_1Mqh_4-",
    "scope":"/accounts.write",
    "refresh_token":"i1qxz68gu50zp4i8ceyxqogmq7y0yienm52351c6..."
  }'
Note: Replace
https://your-domain.comwith scheme and domain only (no path) matching a domain registered in your API key's allowed domain list in the Dashboard under Developers → API keys. Even if you have multiple domains registered, set only one — the one the current request originates from.localhostis not an accepted domain. Failure to set the header correctly will cause subsequent API calls made with the token to fail with a 401.
Create an account connection
This step is optional. After you create an account, you can share scopes with it so the account (for example, a merchant) can view its own customers on Moov. The connected accounts guide lists the scopes you can share and shows the request.
Next steps
After you've created accounts, link a source like a card or bank account so you can start moving money.
Business accounts
Create a business Moov account with the API, SDKs, Moov.js, or onboarding Drop. Request capabilities, send the platform agreement, and add representatives.
Individual accounts
Create an individual Moov account with the API, SDKs, Moov.js, or onboarding Drop. Request capabilities and send Moov's platform agreement.