Payment links
Moov verifies the customer, creates their Moov account, links the payment method they choose, and creates the transfer. When the payment link is submitted, Moov emails a receipt. Create payment links with the API or the Dashboard.
Before you start
- To accept payments: the merchant account has the
collect-fundscapabilities for the methods you allow (for example,collect-funds.card-payments) - To send payouts: the merchant account has the
send-fundscapabilities for the payout rails you allow, and enough wallet balance to fund the payout - The merchant's
moov-walletpayment method ID (merchantPaymentMethodID) and your partner account ID - Optional: set light and dark mode brand colors in the Dashboard or API; payment links use them as accent colors
Payment methods
To accept a payment, you can choose any or all of the following payment methods:
- Apple Pay
- Google Pay
- Card
- ACH debit collect
To send a payout, you can choose any or all of the following payment methods (payout.allowedMethods):
- Push to card (
push-to-card), with instant or deferred delivery - Push to Apple Pay or Google Pay (
push-to-apple-pay,push-to-google-pay) - Instant payments (RTP or FedNow):
rtp-credit, orinstant-bank-creditwith APIv2026.10.00and later - Same-day ACH (
ach-credit-same-day) - Standard ACH (
ach-credit-standard)
Payment link statuses
status |
Meaning |
|---|---|
active |
The link can be used |
used |
The link reached its maxUses (payout links are always single use) |
expired |
The expiresOn time has passed |
disabled |
The link was disabled |
Each payment submitted through a link creates a transfer. Track it with transfer.created and transfer.updated webhooks, as you would any other transfer.
Configure a payment link
When creating a payment link, you're required to provide the merchant account ID in the path and the partner account ID in the request. Note that sometimes a partner can be acting as a merchant and therefore the ID is the same account ID for both. Additionally, you must send the merchant's payment method ID and the payment amount.
You can optionally require other data such as customer address or phone number, metadata, and a custom dynamic descriptor for the statement. You can also set an expiration date and limit on the amount of times a payment link can be used.
Additionally, you can set line items, tax, surcharge fees, and tipping options. The sections below describe these options.
Once a payment link is created, you'll receive a sharable URL and QR code. The URL will be in the following format: https://moov.link/p/{unique-payment-link}. URLs and QR codes can be retrieved again using the GET payment link or QR code endpoints, or in the Dashboard by navigating to Transfers > Payment links.
Line items
When you create a payment link you have the option of creating a line item. Line items allow you to list items within the transaction, each with their own distinct name, description, image, and price modifier. For tracking purposes, you can give each item a unique identifier using the productID field.
When using line items, the total amount of the payment link needs to include all additional costs and price modifiers associated with each item.
{
  "lineItems": {
    "item": {
      "basePrice": {
        "currency": "USD",
        "valueDecimal": "14.95"
      },
      "name": "Lunch combo 1",
      "productID": "5afv22245-7095-24ba-b21a-5c4dc993737",
      "quantity": 1
    }
  }
}
Payout delivery speed and fees
For push-to-card and push-to-Apple-Pay payouts, payout.pushOptions.allowedSpeeds lets the recipient choose instant delivery, deferred delivery, or both. Deferred payouts require deferredBy (24h or 48h).
To pass the payout fee to the recipient, set payout.feePaidBy with one key per rail; any key you leave out defaults to source (the funding wallet). See fee keys by rail for every key.
 1{
 2  "payout": {
 3    "allowedMethods": ["push-to-card", "ach-credit-standard"],
 4    "recipient": {
 5      "email": "jordan@example.com"
 6    },
 7    "pushOptions": {
 8      "allowedSpeeds": ["instant", "deferred"],
 9      "deferredBy": "24h"
10    },
11    "feePaidBy": {
12      "instant-push-to-card": "destination",
13      "deferred-push-to-card": "source",
14      "ach-credit-standard": "source"
15    }
16  }
17}
Tax & surcharge fees
In Moov API v2026.07.00 and later, within amountDetails, you can set sales tax and/or a surcharge fee (for credit card transactions).
Surcharging is optional for credit card transactions, but if enabled, the account must follow card brand caps, as well as additional card network rules and state and federal regulations. See the main surcharge guide for details on compliance, disclosures, and regulations.
{
  "amountDetails": {
    "surcharge": {
      "currency": "USD",
      "valueDecimal": "2.00"
    },
    "tax": {
      "currency": "USD",
      "valueDecimal": "6.00"
    }
  }
}
To check whether a card is credit before applying a surcharge, see check card type.
You can only use the get card metadata endpoint if you have provided Moov with a copy of your PCI attestation of compliance.
Tax and surcharge fees are not available for payment links with user defined amounts.
Tipping
Tipping presets must be configured via the POST transfer config endpoint. Presets can either be a percentage of the total, or a fixed amount, such as 10%, 15%, and 20%, or $1.00, $1.50, and $2.00. Preset percentages must also be set to calculate on either the pre-tax or post-tax amount. Fixed amount presets must also set the currency.
See the tipping guide for more information on preset configuration. If you enable tipping without any presets, the customer will be prompted to enter a custom amount in a free-form field.
By default, tipping is disabled. To enable tipping, set tippingEnabled: true when you create a payment link.
{
  "customer": {
    "requirePhone": true,
    "tippingEnabled": true
  }
}
User defined amounts
With Moov API 2026.07.00 and higher, you can allow a user to enter their own amount. Instead of choosing a product or entering an amount, you can let the end-user choose the amount to pay or receive.
With this option, you can set a minimum and maximum range, as well as select up to five suggested amounts. If either minimum or maximum is omitted, the limit for that end is open. If suggested amounts are set, they must use USD and fall within the amountRange.
{
  "customAmountPayment": {
    "allowedMethods": [
      "apple-pay",
      "card-payment",
      "google-pay"
    ],
    "amountRange": {
      "minimum": {
        "currency": "USD",
        "valueDecimal": "10.00"
      },
      "maximum": {
        "currency": "USD",
        "valueDecimal": "100.00"
      }
    },
    "suggestedAmounts": [
      {
        "currency": "USD",
        "valueDecimal": "25.00"
      },
      {
        "currency": "USD",
        "valueDecimal": "50.00"
      },
      {
        "currency": "USD",
        "valueDecimal": "100.00"
      }
    ]
  }
}
The user will see the options in their checkout process.
Create a payment link with the API
Use the payment links POST endpoint to send either a payment, payout, or customAmountPayment.
You can limit the amount of times a payment link can be used with the maxUses field. By setting maxUses to 0, there is no limit on the amount of times the link can be used. For payouts, maxUses is always 1. The response will include a paymentLinkCode, which you can use to retrieve a specific payment link later on.
Only the account that creates the payment link can update it. The ownerAccountID is returned in the response for reference. This ID will correspond to the partnerAccountID or merchantAccountID of the account that created the payment link.
The examples below show one payment link with line items, one payment link with a user defined amount, and one payout with fees.
curl -X POST "https://api.moov.io/accounts/{accountID}/payment-links" \
  -H "Authorization: Bearer {token}" \
  -H "x-moov-version: v2026.07.00" \
  --data-raw '{
    "accountID": "c197cd40-7745-4413-8f3b-ec962d1b5225",
    "merchantPaymentMethodID": "3afc7533-7095-43bb-b21a-5c4dc5568451",
    "partnerAccountID": "d290f1ee-6c54-4b01-90e6-d701748f0851",
    "amount": {
      "currency": "USD",
      "value": 1645
    },
    "amountDetails": {
      "surcharge": {
        "currency": "USD",
        "valueDecimal": "0.45"
      },
      "tax": {
        "currency": "USD",
        "valueDecimal": "1.05"
      }
    },
    "lineItems": {
      "item": {
        "basePrice": {
          "currency": "USD",
          "valueDecimal": "14.95"
        },
        "name": "Lunch combo 1",
        "productID": "5afv22245-7095-24ba-b21a-5c4dc993737",
        "quantity": 1
      }
    },
    "maxUses": 0,
    "expiresOn": "2026-08-24T14:15:22Z",
    "display": {
      "title": "string",
      "description": "string",
      "callToAction": "pay"
    },
    "customer": {
      "requirePhone": true,
      "tippingEnabled": true
    },
    "payment": {
      "allowedMethods": [
        "apple-pay",
        "card-payment",
        "google-pay"
      ]
    }
  }'
curl -X POST "https://api.moov.io/accounts/{accountID}/payment-links" \
  -H "Authorization: Bearer {token}" \
  -H "x-moov-version: v2026.07.00" \
  --data-raw '{
    "accountID": "c197cd40-7745-4413-8f3b-ec962d1b5225",
    "merchantPaymentMethodID": "3afc7533-7095-43bb-b21a-5c4dc5568451",
    "partnerAccountID": "d290f1ee-6c54-4b01-90e6-d701748f0851",
    "maxUses": 0,
    "expiresOn": "2026-08-24T14:15:22Z",
    "display": {
      "title": "string",
      "description": "string",
      "callToAction": "pay"
    },
    "customer": {
      "requirePhone": true,
      "tippingEnabled": false
    },
    "customAmountPayment": {
      "allowedMethods": [
        "apple-pay",
        "card-payment",
        "google-pay"
      ],
      "amountRange": {
        "minimum": {
          "currency": "USD",
          "valueDecimal": "10.00"
        },
        "maximum": {
          "currency": "USD",
          "valueDecimal": "100.00"
        }
      },
      "suggestedAmounts": [
        {
          "currency": "USD",
          "valueDecimal": "25.00"
        },
        {
          "currency": "USD",
          "valueDecimal": "50.00"
        },
        {
          "currency": "USD",
          "valueDecimal": "100.00"
        }
      ]
    }
  }'
curl -X POST "https://api.moov.io/accounts/{accountID}/payment-links" \
  -H "Authorization: Bearer {token}" \
  -H "x-moov-version: v2026.07.00" \
  --data-raw '{
    "accountID": "c197cd40-7745-4413-8f3b-ec962d1b5225",
    "merchantPaymentMethodID": "3afc7533-7095-43bb-b21a-5c4dc5568451",
    "partnerAccountID": "d290f1ee-6c54-4b01-90e6-d701748f0851",
    "amount": {
      "currency": "USD",
      "value": 10000
    },
    "lineItems": {
      "item": {
        "basePrice": {
          "currency": "USD",
          "valueDecimal": "100.00"
        },
        "name": "Service",
        "productID": "5afv22245-7095-24ba-b21a-5c4dc993737",
        "quantity": 1
      }
    },
    "maxUses": 0,
    "expiresOn": "2026-08-24T14:15:22Z",
    "display": {
      "title": "string",
      "description": "string",
      "callToAction": "confirm"
    },
    "payout": {
      "allowedMethods": [
        "push-to-card",
        "ach-credit-same-day"
      ],
      "recipient": {
        "phone": {
          "number": "5555555555",
          "countryCode": "1"
        }
      },
      "pushOptions": {
        "allowedSpeeds": ["instant", "deferred"],
        "deferredBy": "24h"
      },
      "feePaidBy": {
        "instant-push-to-card": "destination",
        "deferred-push-to-card": "destination",
        "ach-credit-same-day": "source"
      }
    }
  }'
Get generated QR code
To facilitate in-person payments, you have the ability to generate a QR code for a customer to use with the payment links QR GET endpoint.
To generate a QR code, pass the accountID and paymentLinkCode.
curl -X GET "https://api.moov.io/accounts/{accountID}/payment-links/{paymentLinkCode}/qrcode" \
  -H "Authorization: Bearer {token}" \
  -H "Accept: image/png" \
  -H "x-moov-version: v2026.07.00"
Manage payment links
Once a payment link is created, you can manage it through the API or the Dashboard. You can list all created payment links, find a specific one, update it, or disable it.
Retrieve
View a list of all payment links with the list payment links GET endpoint, or view an individual payment link with the retrieve payment links GET endpoint.
To list all payment links for an account, pass the accountID.
curl -X GET "https://api.moov.io/accounts/{accountID}/payment-links" \
  -H "Authorization: Bearer {token}" \
  -H "x-moov-version: v2026.07.00"
To retrieve a specific payment link for an account, pass the accountID and paymentLinkCode. The payment link code is provided in the initial POST response when created a payment link. You can use the list payment link endpoint to retrieve all payment links and their payment link codes.
curl -X GET "https://api.moov.io/accounts/{accountID}/payment-links/{paymentLinkCode}" \
  -H "Authorization: Bearer {token}" \
  -H "x-moov-version: v2026.07.00"
Update
You have the ability to update certain properties of payment links with the payment links PATCH endpoint. You can update the amount, expiration date, display options, customer data, as well as payment and payout options.
Only the account that created the payment link can update the payment link. The ownerAccountID is returned in the create payment link response if needed for reference.
To update a payment link, pass the accountID and paymentLinkCode.
curl -X PATCH "https://api.moov.io/accounts/{accountID}/payment-links/{paymentLinkCode}" \
  -H "Authorization: Bearer {token}" \
  -H "x-moov-version: v2026.07.00" \
  --data-raw '{
    "amount": {
      "currency": "USD",
      "value": 1204
    },
    "expiresOn": "2027-08-24T14:15:22Z",
    "display": {
      "title": "string",
      "description": "string",
      "callToAction": "pay"
    },
    "customer": {
      "requireAddress": true,
      "requirePhone": true,
      "metadata": {
        "property1": "string",
        "property2": "string"
      }
    },
    "payment": {
      "allowedMethods": [
        "apple-pay"
      ],
      "cardDetails": {
        "dynamicDescriptor": "WhlBdy *Yoga 11-12"
      },
      "achDetails": {
        "companyEntryDescription": "Gym Dues",
        "originatingCompanyName": "Whole Body Fit"
      }
    }
  }'
Disable
You can disable a payment link at any time. Customers will receive an error page if they try and access a disabled payment link. Use the payment links DEL endpoint to disable the link.
To delete (disable) a payment link, pass the accountID and paymentLinkCode.
curl -X DELETE "https://api.moov.io/accounts/{accountID}/payment-links/{paymentLinkCode}" \
  -H "Authorization: Bearer {token}" \
  -H "x-moov-version: v2026.07.00"
In the Dashboard
Navigate to Payment links in the Dashboard. You can view your payment link history or create a new payment link.
Before you send your first payment link, you have the option to set up brand colors. Click on the Brand settings button to set light and dark mode colors for your payment links.
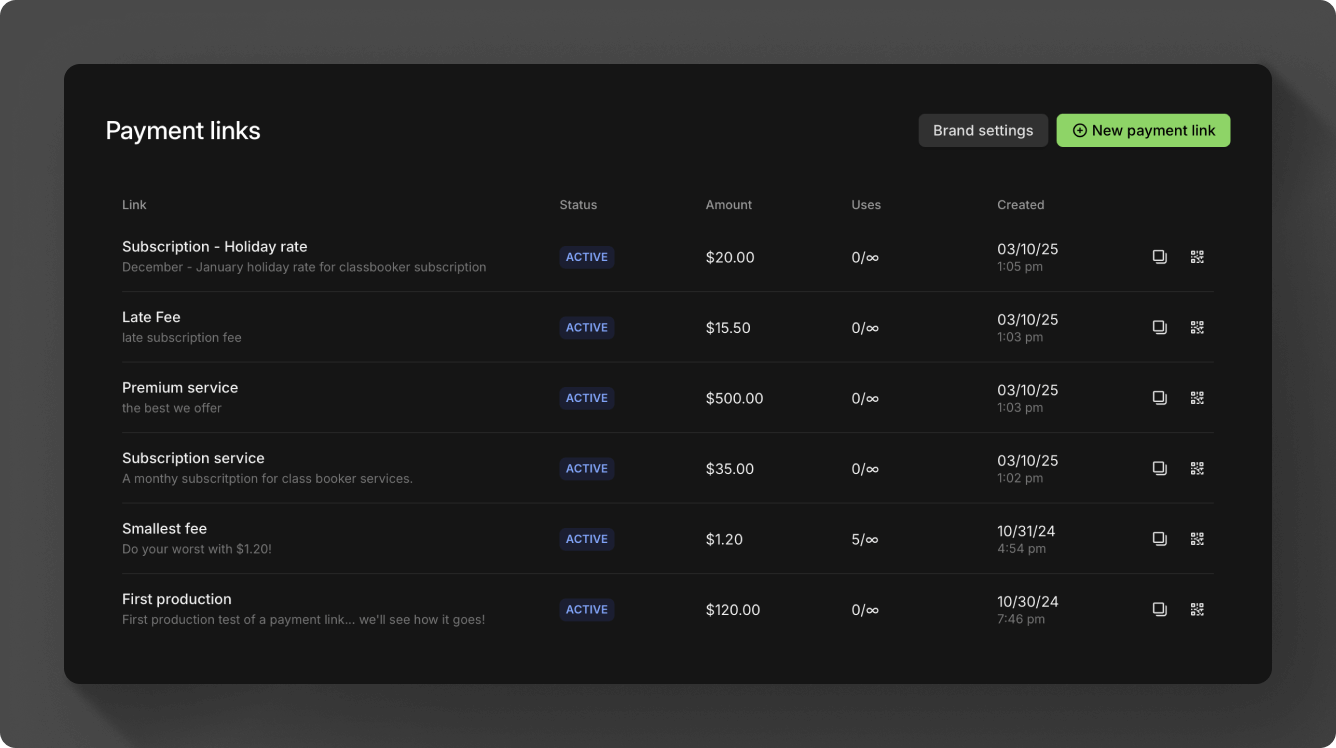
Create a payment link in the Dashboard
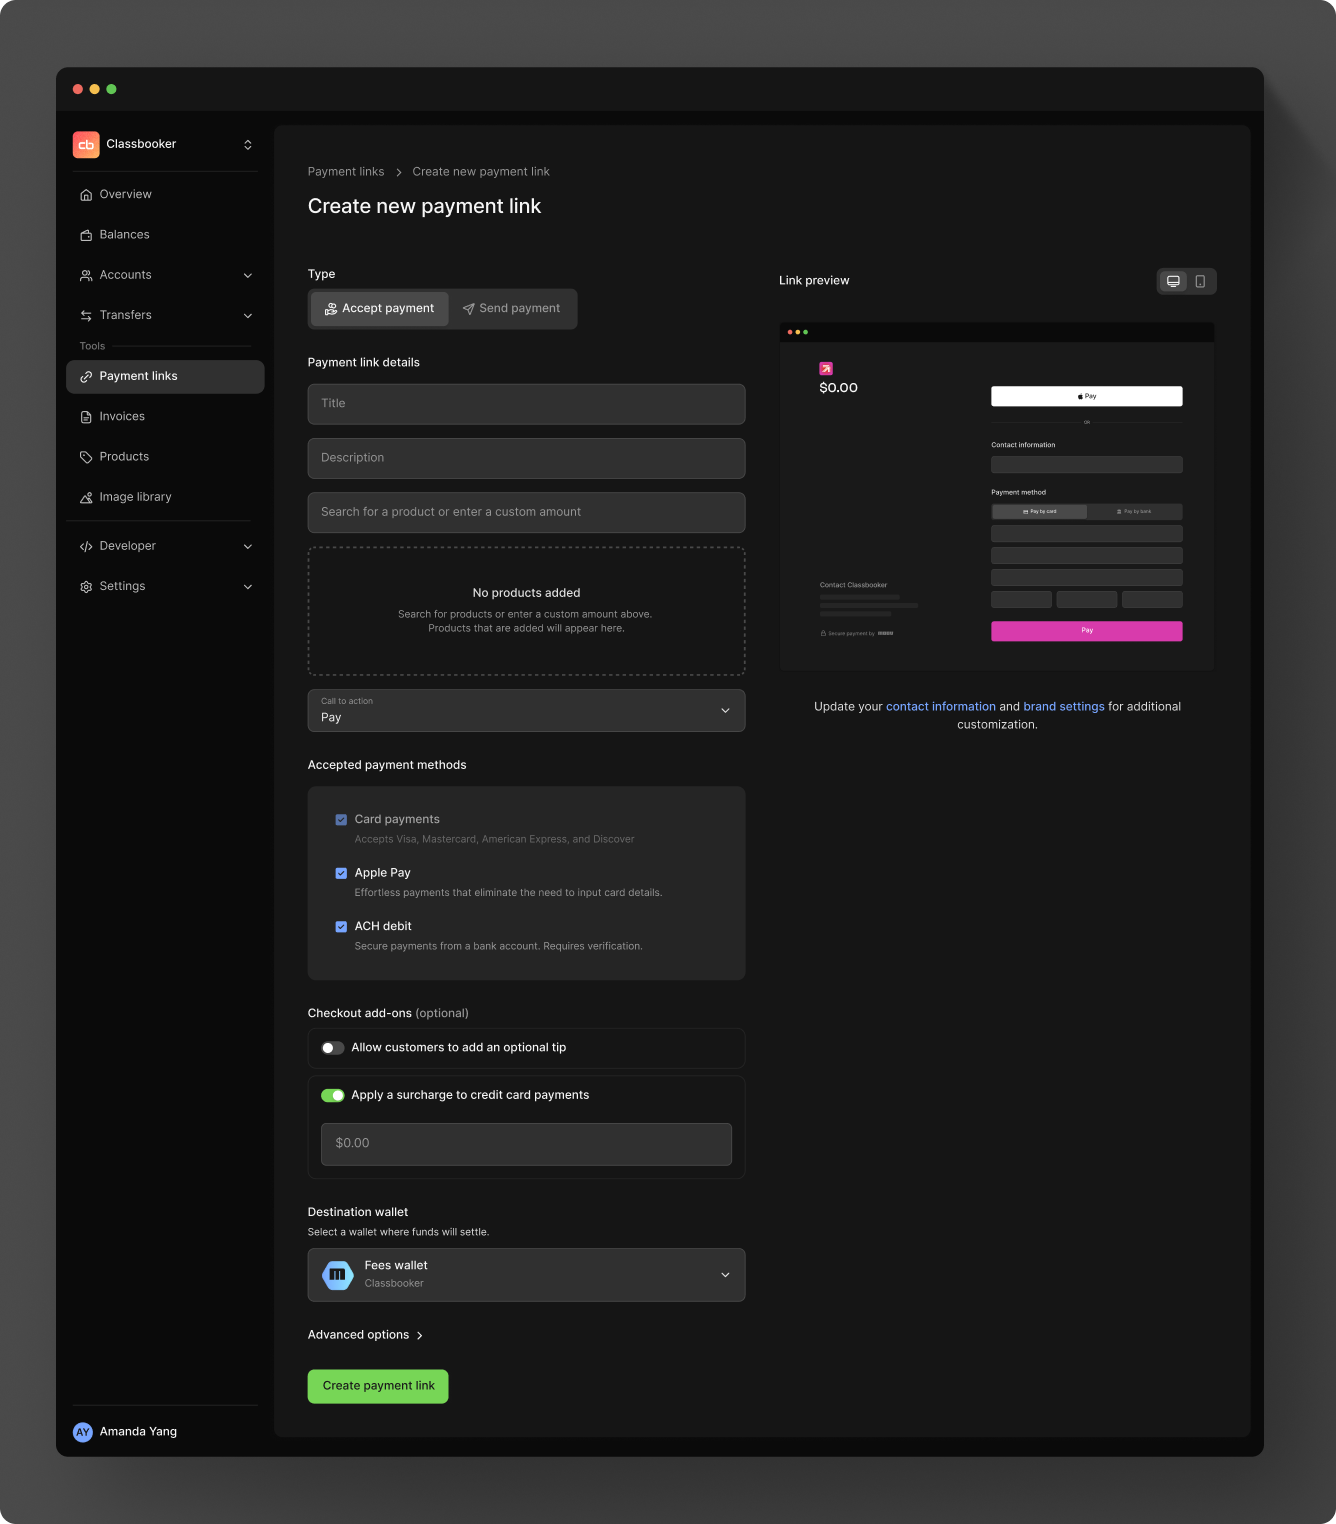
Click the New payment link button and choose either the Accept payment or Send payout tab to create a link. Choose the amount and provide a title and description. Choose a product from your catalog, or enter an amount.
If you're sending a payout, you'll also need to provide a phone number or email address for the recipient. The recipient will receive a verification code to the chosen contact method.
Select the payment methods you would like to allow. By default, all payment methods are selected:
| Accept methods | Send methods |
|---|---|
| Card payments | Push to card |
| Apple Pay | Instant payments (RTP or FedNow) |
| Google Pay | ACH credit same day |
| ACH debit | ACH credit standard |
Then select the wallet you would like to accept or payout the funds to. Additionally, when accepting a payment, you can specify one of the following calls to action:
- Pay
- Subscribe
- Book
- Donate
User defined amounts in the Dashboard
Instead of choosing a product or entering an amount, you can let the end-user choose the amount to pay or receive. With this option, you can set a minimum and maximum range, as well as select up to five suggested amounts. If either minimum or maximum is omitted, the limit for that end is open.
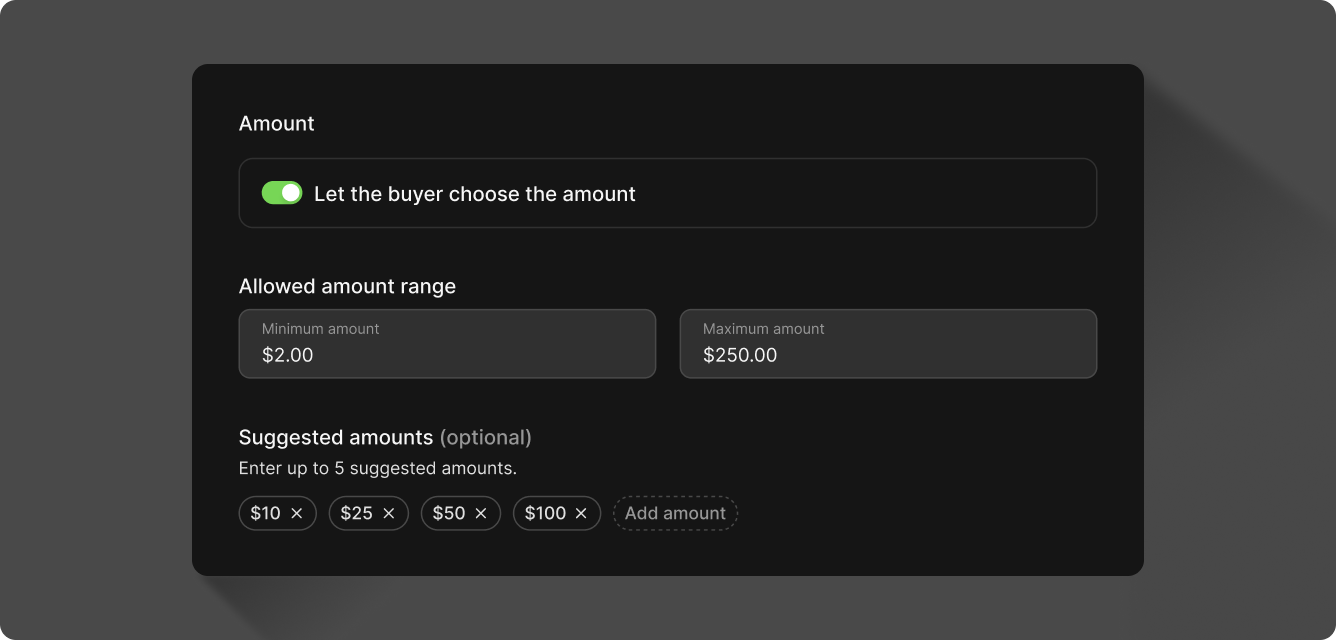
The user will see the options in their checkout process.
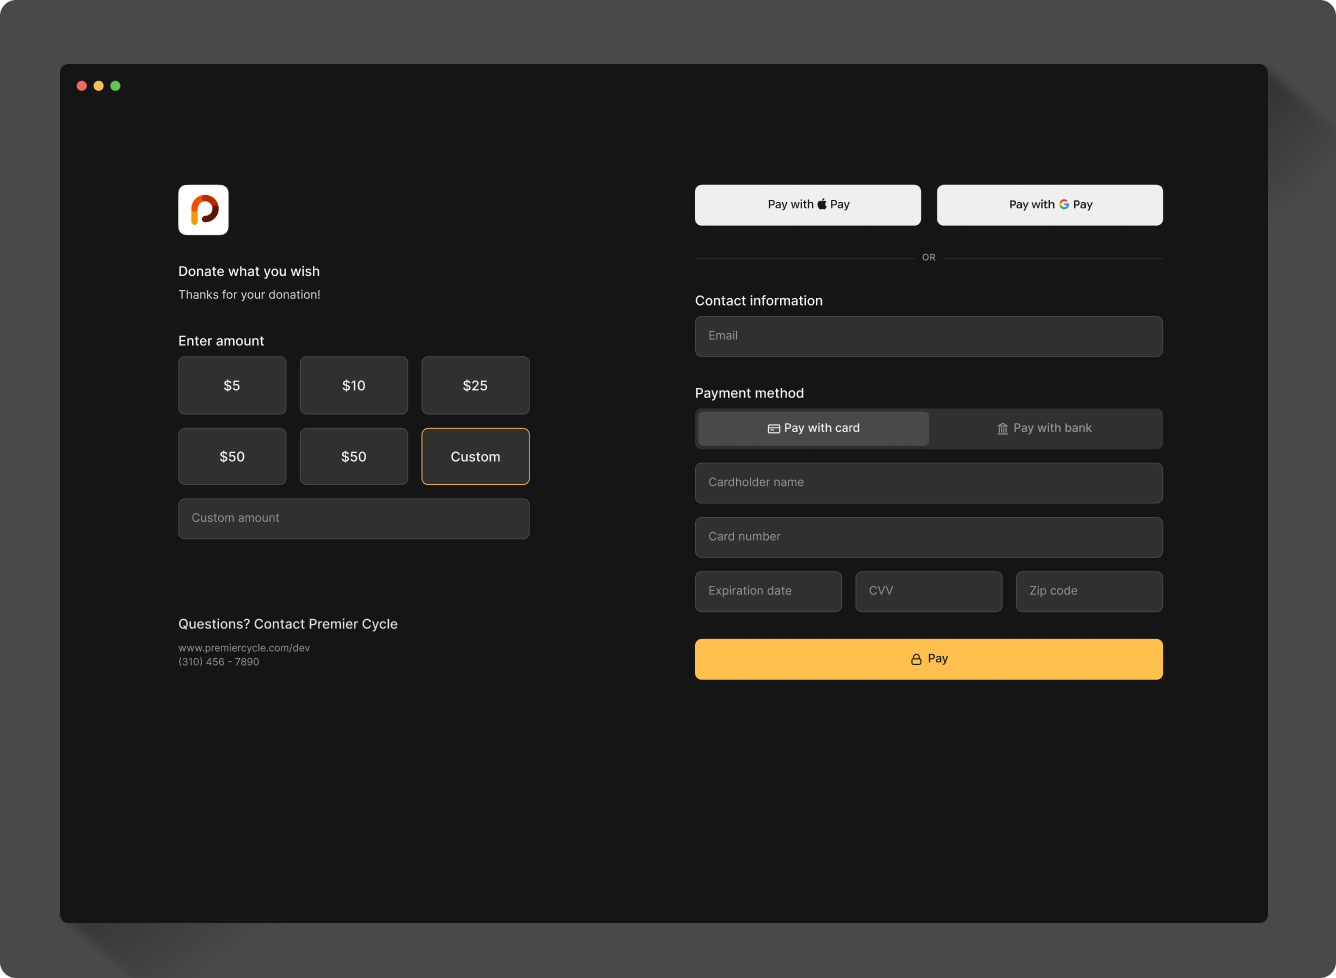
Tax
When you select a product or enter a free-form amount, you'll see Subtotal, Tax, and Total appear. You can click the edit icon next to Tax to manually add a tax to the item.
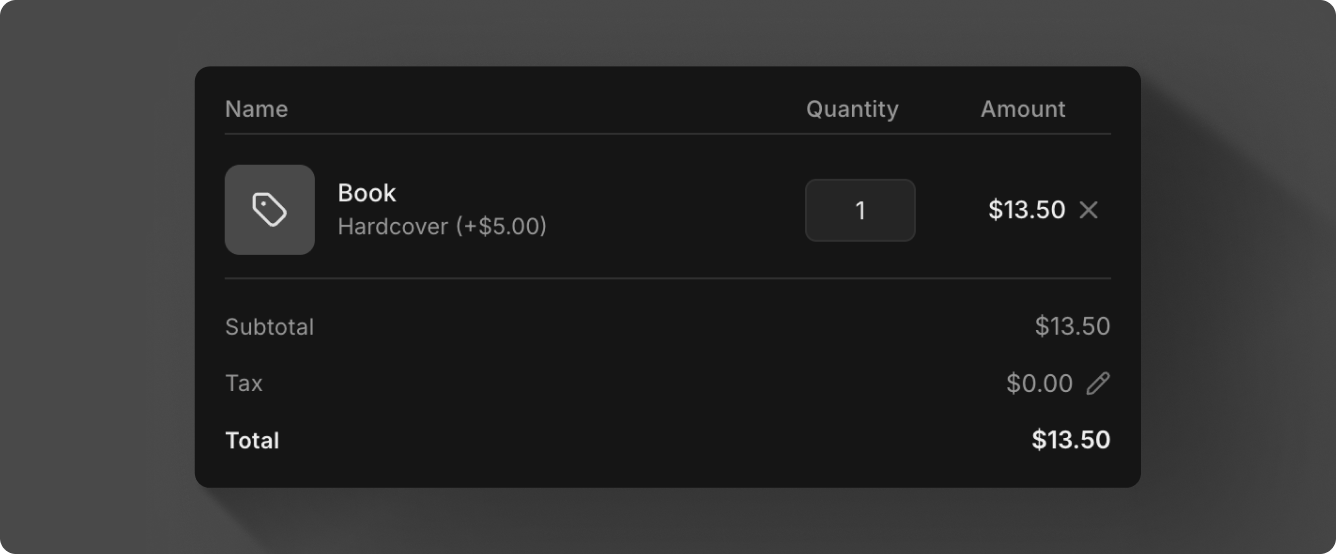
Tax is not available for payment links with user defined amounts.
Surcharging
Surcharging is optional for credit card transactions, but if enabled, the account must follow card brand caps, as well as additional card network rules and state and federal regulations. See the surcharges guide for details on compliance, disclosures, and regulations.
When creating a payment link, under Checkout add-ons, you can enable surcharging and enter the amount to add to the transaction.
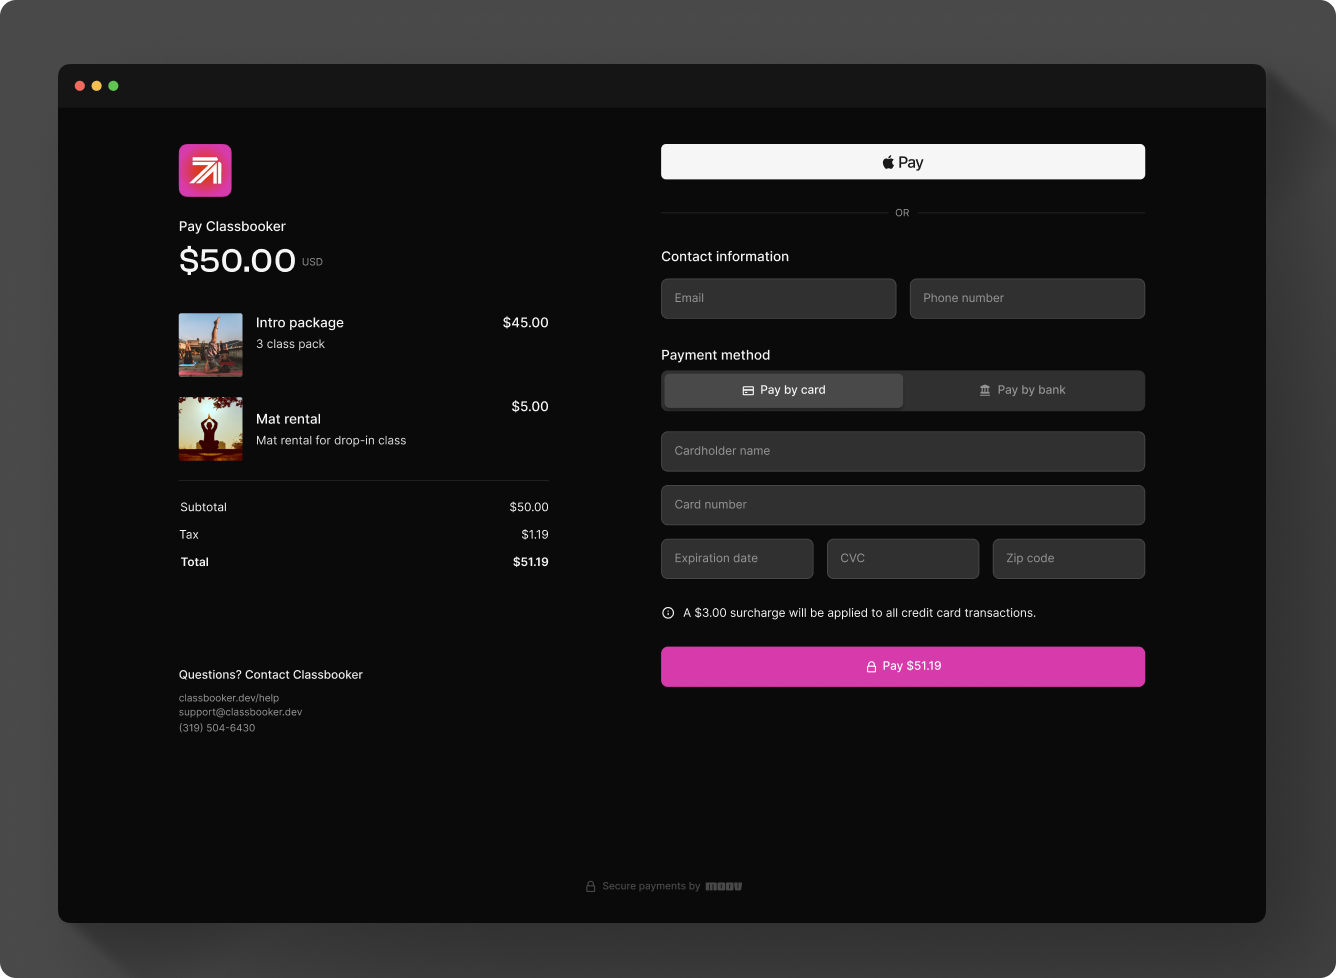
When the customer views the payment request, the surcharge fee will be shown along with a disclaimer near the Pay button.
Transactions including a surcharge can be refunded with either the full surcharge amount or a partial surcharge amount.
Surcharging is not available for payment links with user defined amounts.
Payout fees in the Dashboard
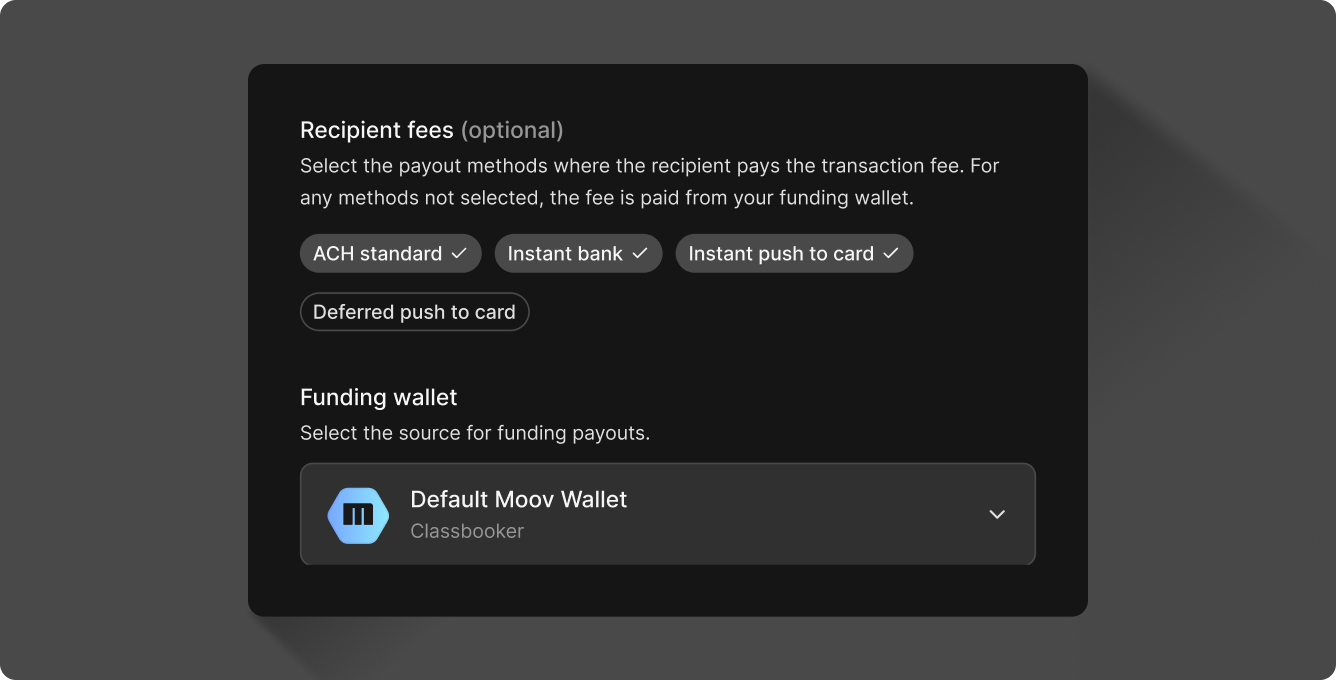
When sending a payout, you have the option to pass along the payout fee to the recipient's payout method. If no method is selected, the funding wallet (source) pays the fee.
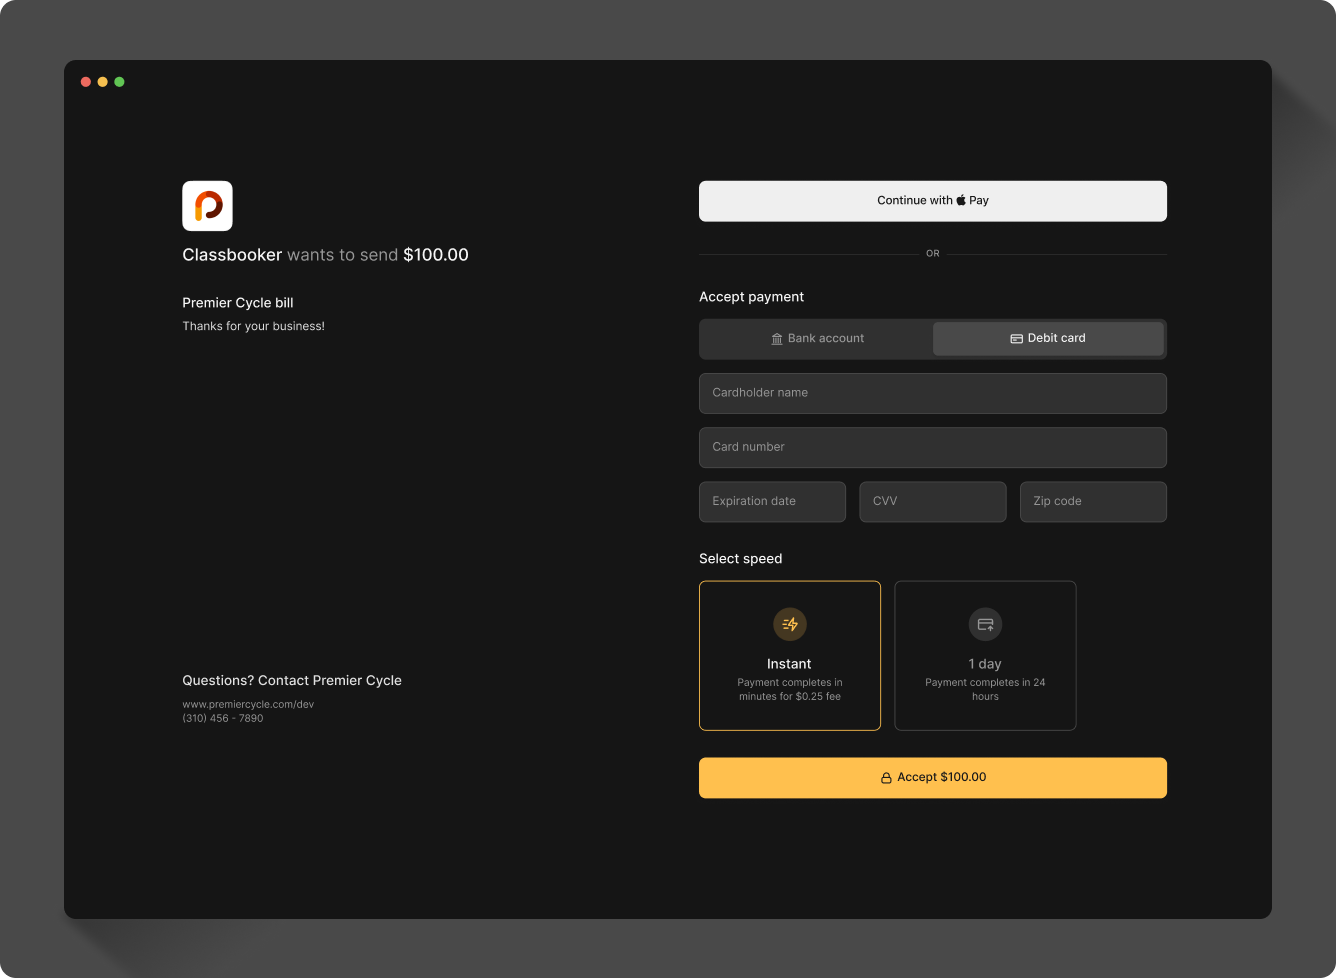
Depending on the fee settings and payment methods selected, the end-user will get to choose how they receive their payment.
For what happens to the payout and fee when a payout fails or is returned, see returns and failed payouts.
Tipping in the Dashboard
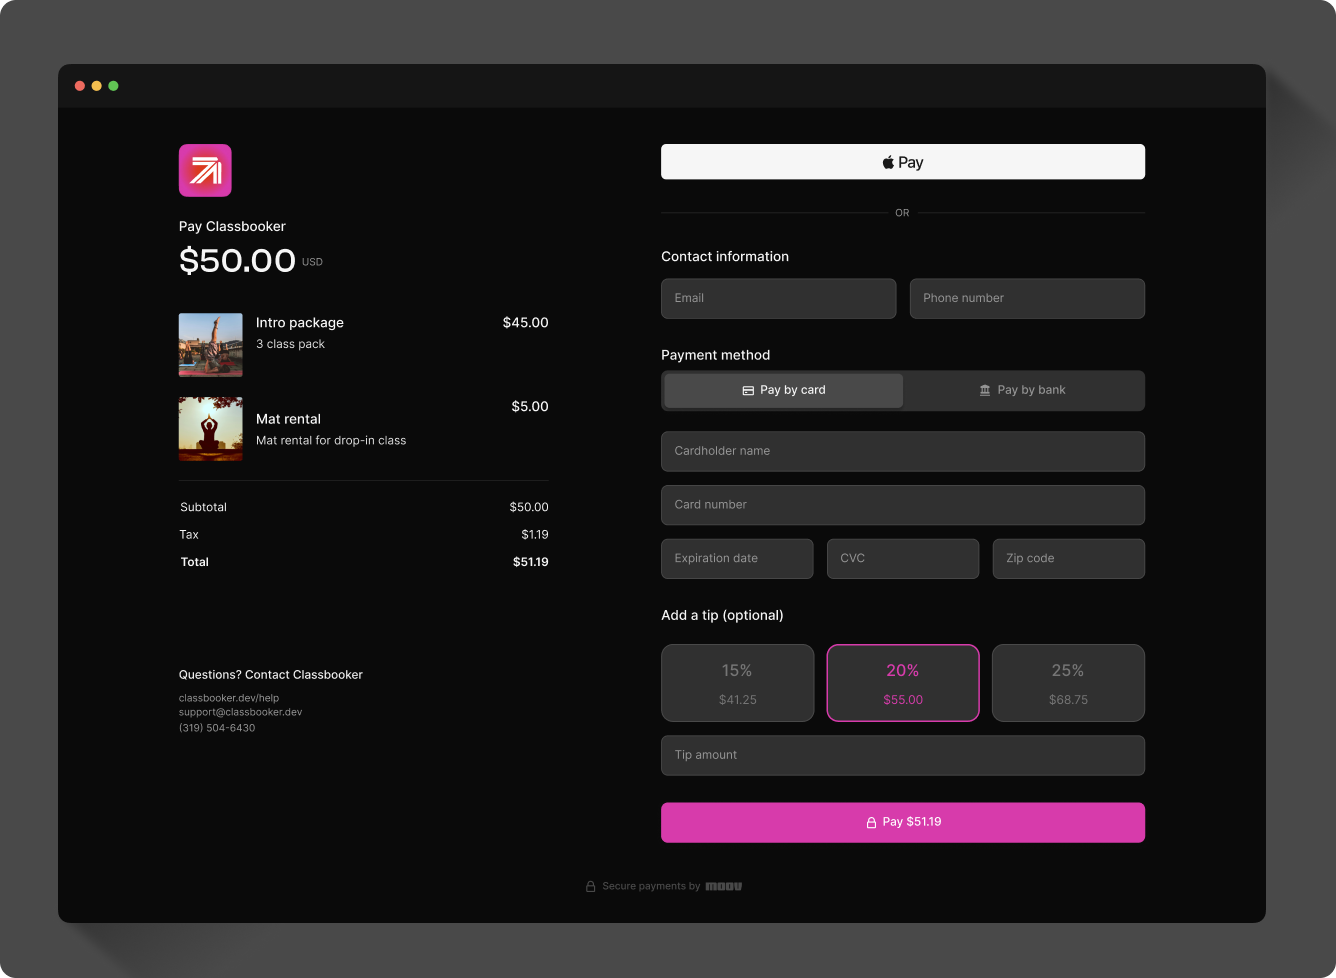
When creating a payment link, under Checkout add-ons, you can enable tipping. If tipping presets have been set, the customer will see three preset options (percentage based or set amounts) as well as a free-form, custom option.
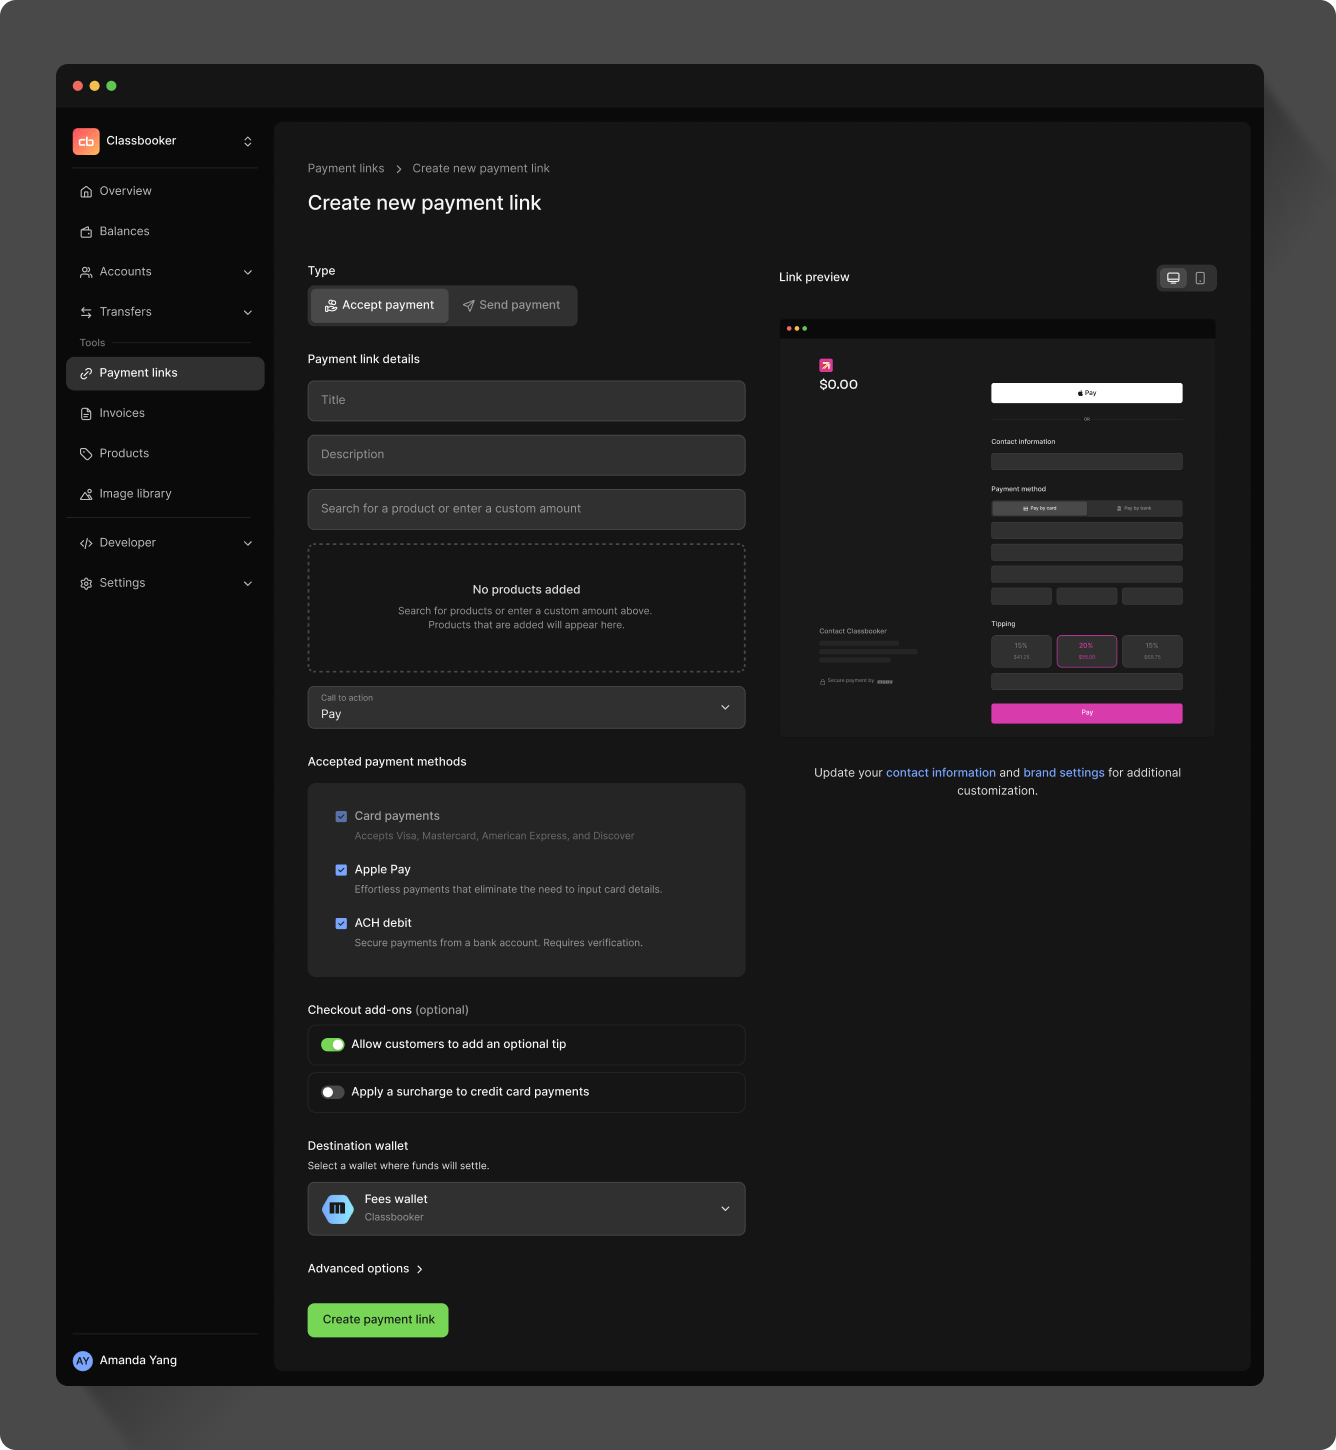
You can also enable tipping for each of your merchants in their account settings.
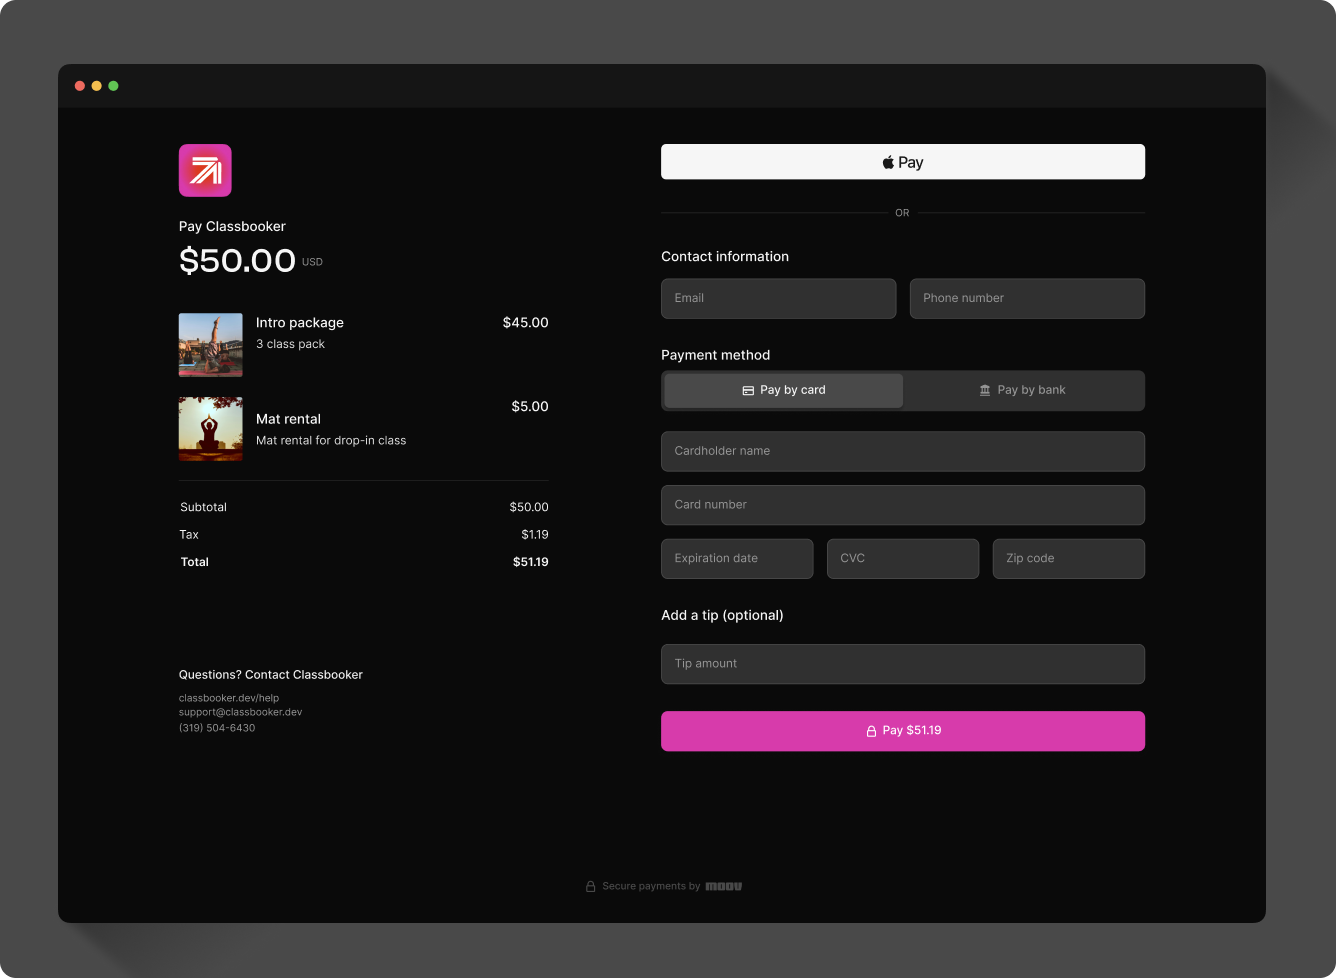
If tipping presets have not been set in your main settings and you enable tipping, the tip field will only show the free-form option. Tipping is always optional for the customer.
Tipping is not available for payment links with user defined amounts.
Sharable link & QR code
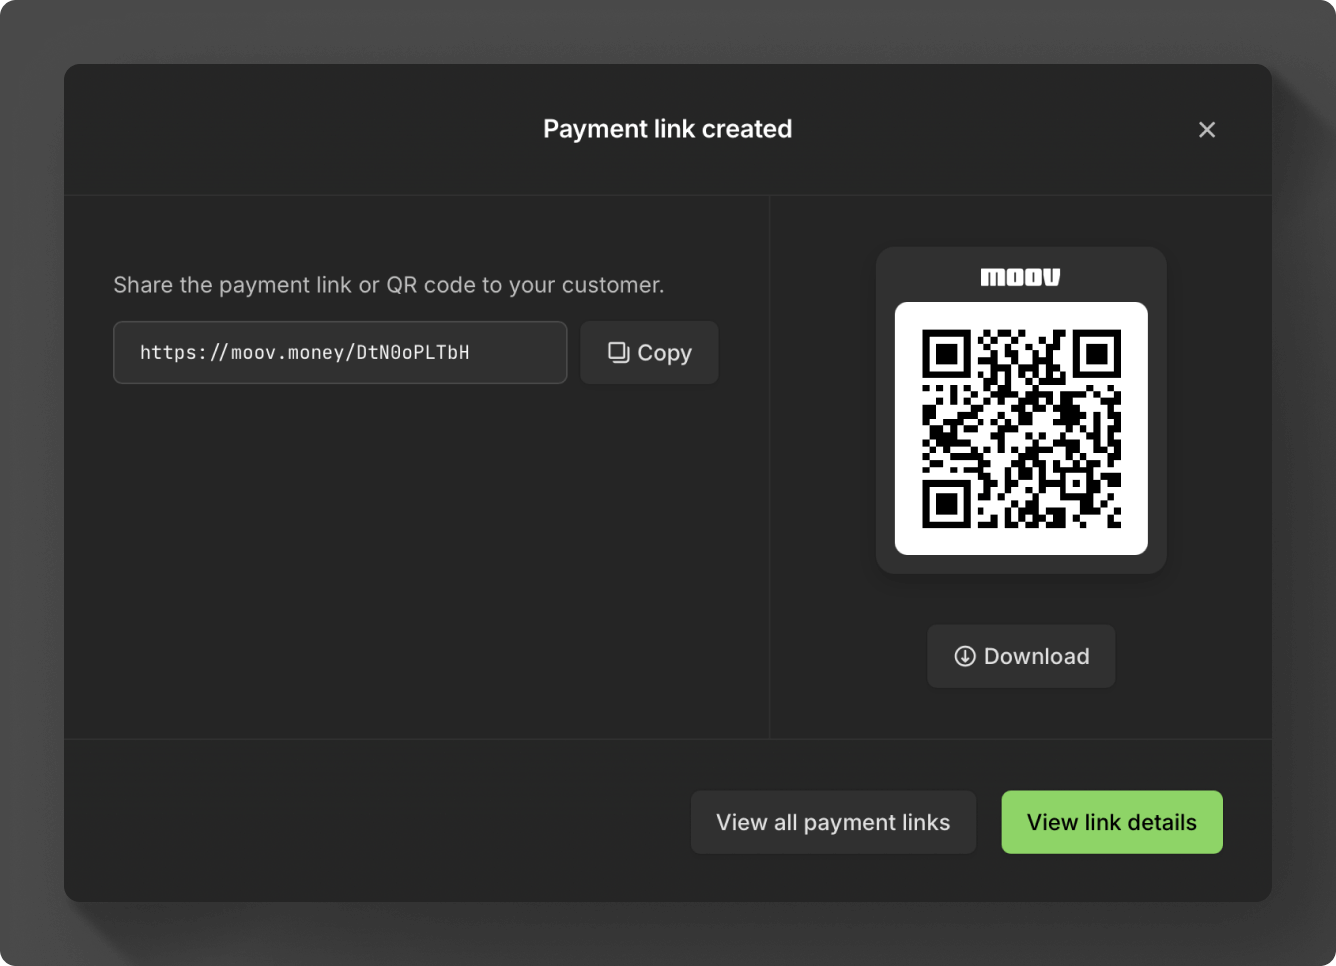
After you create a payment link, you'll be presented with a sharable link and QR code that can be scanned in-person.
Receipts
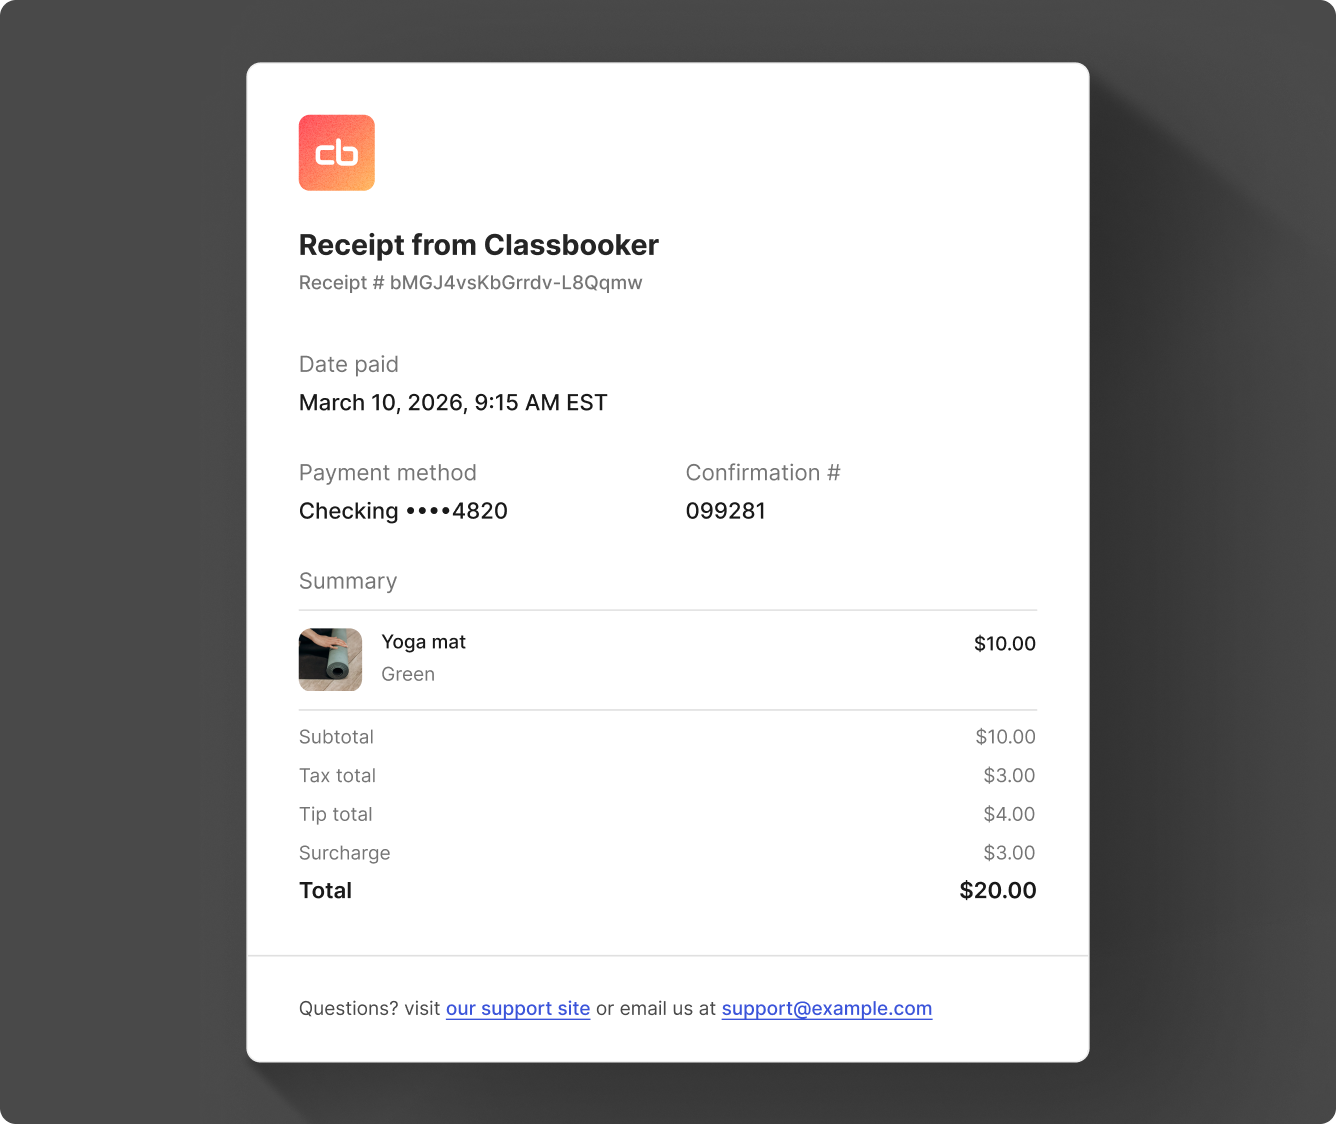
When a payment link is successfully submitted, a receipt will automatically be created and sent via email using the transfer ID and the email/email accountID ID. The payment link's title is passed along in the transfer description and will appear on receipts. Additionally, any optional charges like tips and surcharges will appear on the receipt.
View & edit payment links
When you select a payment link, you can view details, copy the link, and view the QR code. Selecting More actions will allow you to edit the details or delete the payment link.
Only the account that creates the payment link can update the payment link, if needed. For example, if a merchant creates a payment link, only the merchant account has access to update that payment link.
Peek preview for payment links
The peek preview shortcut gives you fast access to details in the Dashboard.
Press the space key to toggle the preview on and off. You can move your cursor up and down the list and the preview will update with the corresponding payment link details. The esc key will also dismiss the preview.
Press c while the preview is open to copy the accountID to your clipboard.