Small business
This guide focuses on the quickest and easiest way to get started with the features of Moov we think you'll find most useful running a small business. Onboard customers to a secure payment platform, add surcharging for card transactions, send payment link QR codes, and smoothly handle refunds and disputes.
Moov offers a variety of integration options to get started. Use Drops or the Dashboard UIs for a low to no-code solution, or choose the API or one of many SDKs for more complex integrations.
For the purposes of this guide, we'll provide Dashboard and API examples.
Onboard customers
As you move through the onboarding process to create Moov accounts, some data is required while other data is optional. To view our full onboarding guides, visit the Dashboard or main onboarding guides.
| Onboarding data | Required |
|---|---|
| Capabilities | ✓ |
| Fee plan | ✓ |
| Scopes | ✓ |
| Return URL | × |
| Terms of service URL | × |
| Prefilled data | × |
Capabilities determine what each Moov account can do, such as receiving transfers, or sending money to others. For risk and fraud protection purposes, we require detailed information when requesting capabilities. For example, we'll request more details if an account wants to collect funds than we would for an account receiving funds.
- Transfers: Authorize debit transfers
- Wallet: Store funds with Moov
- Send funds: Send funds to another account
- Collect funds (Business accounts only): Collect funds from another account
Pricing & fee plans can be assigned to one account or reused for many accounts. New accounts must agree to and accept the fee plan before it can go into effect. Moov offers two types of plans:
- Cost plus: With a cost plus plan, card networks’ interchange fees and Moov’s processing markup are passed along to the account. Cost plus plans are beneficial for accounts with a high and varied transaction volume that prefer to have more control over fees. Fees are broken down into a more digestible and transparent format.
- Flat rate: With a flat rate plan, you can lump all the processing fees together with a flat rate customized for each account. Flat plans are beneficial for accounts with a low transaction volume that prefer a predictable solution over lowering cost as much as possible.
Scopes are used to determine what can be done with the account once it's onboarded. For example, the /accounts.read scope provides access to view all connected user accounts and the /accounts/{accountID}/files.read scope provides access to view or upload files associated with a Moov account.
Read more on required data in our documentation:
Moov will send the terms of service platform agreement as part of the onboarding process through the Dashboard. Everyone with a Moov account must agree to and accept the terms of service before using Moov.
The following clip demonstrates how to create a new onboarding link in the Dashboard:
You'll need to generate and send a terms of service platform agreement as part of the onboarding process. Everyone with a Moov account must agree to and accept the terms of service before using Moov. If you're using the API, an SDK, or Moov Drops to onboard, see the terms of service platform agreement guide for more information and instructions.
The following is a sample request to create an onboarding invite with all available data:
curl --X POST "https://api.moov.io/onboarding-invites" \
  -H "Authorization: Bearer {token}" \
  -H "x-moov-version: v2026.07.00" \
  --data-raw '{
    "returnURL": "https://mycompany.com/account",
    "termsOfServiceURL": "https://mycompany.com/terms-of-service",
    "scopes": [
      "accounts.read",
      "bank-accounts.read",
      "bank-accounts.write",
      "capabilities.read",
      "capabilities.write",
      "profile.read",
      "profile.write",
      "payment-methods.read",
      "transfers.read",
      "transfers.write",
      "wallets.read"
    ],
    "grantScopes": [
      "accounts.read",
      "bank-accounts.read",
      "bank-accounts.write",
      "capabilities.read",
      "capabilities.write",
      "profile.read",
      "profile.write",
      "payment-methods.read",
      "transfers.read",
      "transfers.write",
      "wallets.read"
    ],
    "capabilities": [
      "transfers",
      "wallet.balance"
    ],
    "feePlanCodes": [
      "b6134307-8922-4a72-bf3c-d0297bbe8a35"
    ],
    "prefill": {
      "mode": "production",
      "accountType": "business",
      "profile": {
        "business": {
          "legalBusinessName": "LBM Lenders LLC",
          "doingBusinessAs": "LBM Lenders",
          "businessType": "llc",
          "address": {
            "addressLine1": "123 Main Street",
            "addressLine2": "Apt 302",
            "city": "Boulder",
            "stateOrProvince": "CO",
            "postalCode": "80301",
            "country": "US"
          },
          "phone": {
            "number": "8185551212",
            "countryCode": "1"
          },
          "email": "amanda@classbooker.dev",
          "website": "www.lbmlenders.com",
          "description": "Financial institution for personal lending",
          "taxID": {
            "ein": {
              "number": "123-45-6789"
            }
          },
          "industryCodes": {
            "naics": "522291",
            "sic": "6141",
            "mcc": "6141"
          },
          "primaryRegulator": "FDIC"
        }
      },
      "metadata": {
        "property1": "string",
        "property2": "string"
      },
      "termsOfService": {
        "token": "kgT1uxoMAk7QKuyJcmQE8nqW_HjpyuXBabiXPi6T83fUKRJkA3dsFID6fzitMpm2qrOh4"
      },
      "foreignID": "4528aba-b9a1-11eb-8529-0242ac13003",
      "customerSupport": {
        "phone": {
          "number": "8185551212",
          "countryCode": "1"
        },
        "email": "amanda@classbooker.dev",
        "address": {
          "addressLine1": "123 Main Street",
          "addressLine2": "Apt 302",
          "city": "Boulder",
          "stateOrProvince": "CO",
          "postalCode": "80301",
          "country": "US"
        },
        "website": "www.lbmlenders.com"
      },
      "settings": {
        "cardPayment": {
          "statementDescriptor": "LBM Lenders"
        },
        "achPayment": {
          "companyName": "LBM Lenders"
        }
      }
    }
  }'\
Read more about accounts and onboarding in our documentation:
Use form shortening
Use the enrichment API to find publicly available information to autofill form fields based on an email address. With the enrichment API you can:
- Autocomplete addresses
- Get avatars
- Look up bank by routing number
- List industries
- Enrich business profile
If you're using a Moov.js integration, you can use Moov's pre-built Drops UI for form shortening. Read more in the Moov.js documentation:
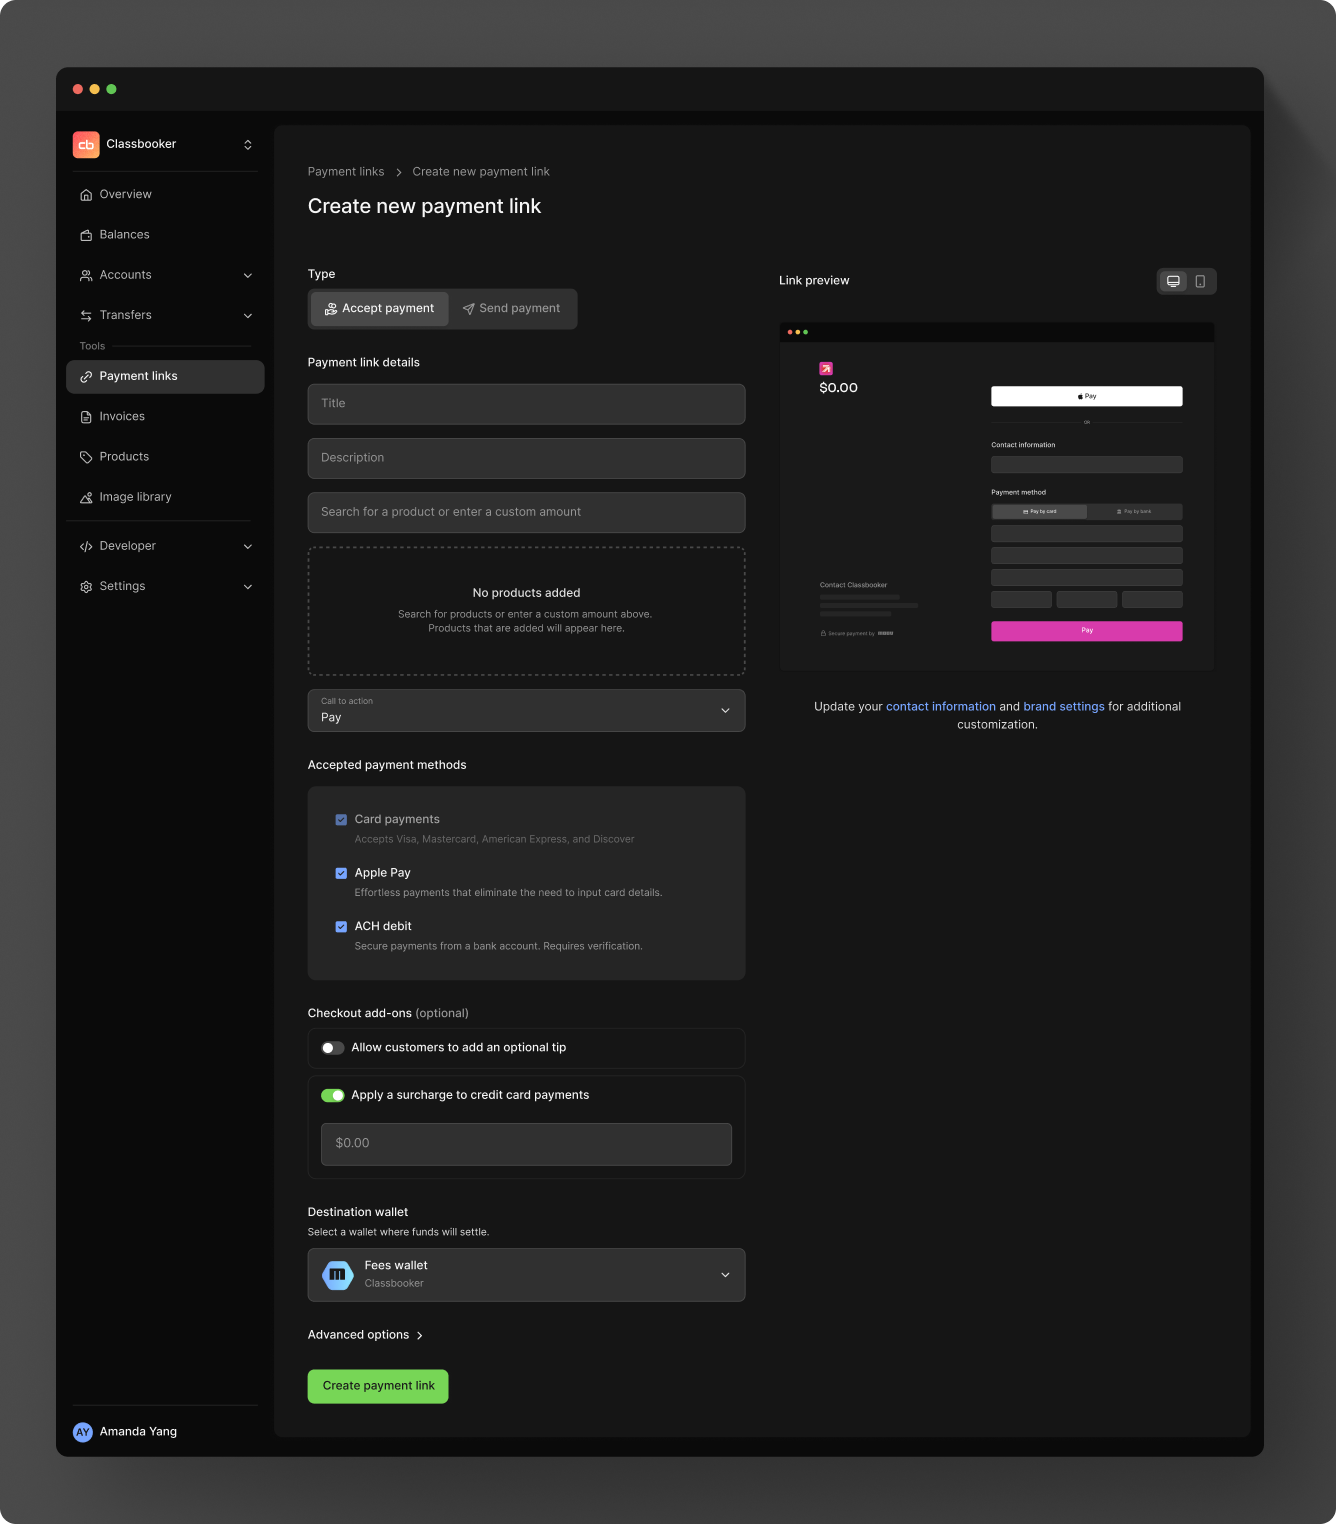
Send secure payment links with surcharge fees
Payment links are a secure way to collet payments from customers. Set up a transaction with a custom amount, or choose a product from your catalog. You can also add tip options or a surcharge fee (as shown in the example).
Payment links can be shared as a URL or Qr code via email, SMS, or social media. When customers click on a link, they can pay using a credit card, debit card, or bank account.
When surcharging is enabled, you must follow card brand caps, as well as federal and state regulations. See our surcharge guide for details on compliance, disclosures, and regulations. Note - surcharging requires a review and registration process with Moov and some card brands before it can be enabled on accounts.
To add a surcharge to a credit card transaction, go to Checkout add-ons, toggle surcharging on, and enter an amount.
You can also create payment links with the API.
The example below adds a surcharge of $4.50 to cover processing costs. A surcharge is only applied to the payment link if the payment method is a credit card. Surcharges (and taxes) can be added to amountDetails when creating a payment link via the API.
 1curl -X POST "https://api.moov.io/accounts/{accountID}/payment-links" \
 2  -H "Authorization: Bearer {token}" \
 3  -H "x-moov-version: v2026.07.00" \
 4  --data-raw '{
 5    "accountID": "c197cd40-7745-4413-8f3b-ec962d1b5225",
 6    "merchantPaymentMethodID": "3afc7533-7095-43bb-b21a-5c4dc5568451",
 7    "amount": {
 8      "currency": "USD",
 9      "value": 16350
10    },
11    "amountDetails": {
12      "surcharge": {
13        "currency": "USD",
14        "valueDecimal": "4.50"
15      },
16      "tax": {
17        "currency": "USD",
18        "valueDecimal": "9.00"
19      }
20    },
21    "maxUses": 0,
22    "expiresOn": "2026-08-24T14:15:22Z",
23    "display": {
24      "title": "string",
25      "description": "string",
26      "callToAction": "pay"
27    },
28    "customer": {
29      "requireAddress": true,
30      "requirePhone": true,
31      "metadata": {
32        "property1": "string",
33        "property2": "string"
34      }
35    },
36    "payment": {
37      "allowedMethods": [
38        "apple-pay",
39        "card-payment",
40        "ach-debit-collect"
41      ],
42      "cardDetails": {
43        "dynamicDescriptor": "Monthly payment 08-26"
44      },
45      "achDetails": {
46        "companyEntryDescription": "Monthly dues",
47        "originatingCompanyName": "Quahog & Co"
48      }
49    }
50  }'\
Facilitate in-person payments
Moov supports in-person payments via QR codes and Tap to Pay on iPhone and Android.
QR codes
QR codes are generated through the payment links process. Once a payment link has been created in the Dashboard, you'll be presented with a URL and QR code to copy and send. If you're using the API, the payment link code will be in the response. You can append the code to the payment link URL https://moov.link/ and send it to customers.
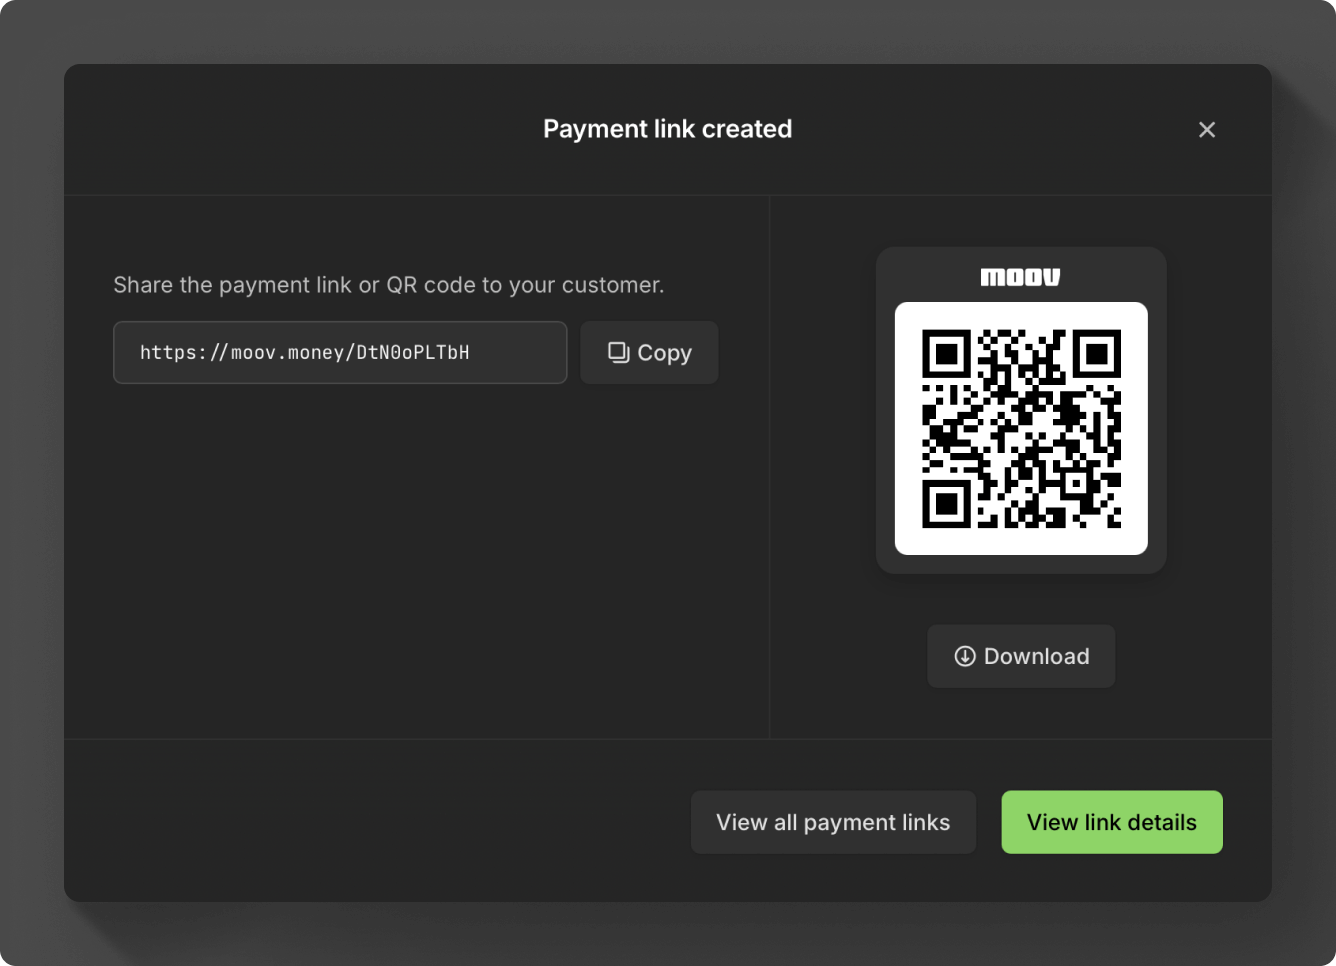
The following is an example response when creating a payment link. The payment link URL with the code would be https://moov.link/3QLHtONjd5.
 1{
 2  "amount": {
 3    "currency": "USD",
 4    "value": 100000
 5  },
 6  "code": "3QLHtONjd5",
 7  "createdOn": "2026-01-09T17:09:13.33Z",
 8  "customer": {
 9    "requirePhone": true
10  },
11  "display": {
12    "callToAction": "pay",
13    "description": "This is an example payment link.",
14    "title": "Example Payment Link"
15  },
16  "link": "https://moov.link/3QLHtONjd5",
17  "merchantAccountID": "34233b72-780c-4e0e-8b08-cbbe1bc878f8",
18  "merchantPaymentMethodID": "4c4e7f8e-81f4-4f3d-8f6f-6f6e7f8e4c4e",
19  "mode": "sandbox",
20  "partnerAccountID": "d290f1ee-6c54-4b01-90e6-d701748f0851",
21  "payment": {
22    "allowedMethods": [
23      "card-payment",
24      "ach-debit-collect"
25    ]
26  },
27  "status": "active",
28  "updatedOn": "2026-01-09T17:09:13.33Z",
29  "uses": 0
30}
You can also use the payment link GET endpoint to retrieve the QR code.
Tap to Pay
Tap to Pay on iPhone and Android involves integrating with Moov's iOS SDK, MoovKit and Moov's Android SDK.
Tap to Pay on iPhone is compatible with devices that meet the following criteria:
- iPhone XS or newer
- iOS 16.0+ (US)
- Latest iOS version recommended for optimal performance
To set up Tap to Pay on iPhone, you'll need to go through the following steps:
- Initialize with MoovKit
- Request entitlement from Apple
- Review Apple's guidelines
- Implement a terminal configuration provider to initialize MoovKit
- Register your app with Moov
- Accept Apple's terms and conditions per merchant identifier
Tap to Pay on Android is compatible with devices that meet the following criteria:
Operating System
- Android 10.0 (API 29) minimum
- Google Play Services v11+
- Official Android release
Hardware Features
- Active NFC antenna
- ARM processor architecture
- Secure element for key storage
- Unmodified manufacturer firmware
Security Status
- Passes Google Play Integrity verification
- No root access detected
- Original bootloader intact
- Accurate system time
To set up Tap to Pay on Android, you'll need to go through the following steps:
- Set up your app through Google Play
- Register your app with Moov
- Initialize with Android SDK
Handle reversals & refunds
Moov's reversal process offers a robust solution for returning funds to a cardholder, regardless of the current state of the transfer. When possible, a reversal cancels the transfer, reversing the authorization and swiftly returning funds. If a reversal is not possible, a refund is initiated instead.
Moov automatically moves your request into the reversal or refund flow depending on settlement status and type, such as a full or partial refund.
For ACH transfers, depending on settlement status, you also have the option of cancelling the ACH transfer directly. If a transfer is cancelable, you will have a Cancel option within the Dashboard.
Read more about reversals, refunds, and cancellations in our documentation:
Handle disputes
The Dashboard will notify you of any disputes that come in and the deadline in which they will need to be handled. You can choose to accept the dispute and facilitate a refund, or challenge the dispute by submitting evidence.
Within the Dashboard, you can view, accept, challenge, delete, and update disputes, as well as view, upload, and update dispute evidence. Moov currently supports RDR (Visa Rapid Dispute Resolution) decisioned pre-disputes and chargebacks from all card networks.
To accept the dispute, click the Refund button and follow the refund procedure.
If you challenge the dispute, the Dashboard will guide you through uploading and submitting evidence, such as proof of purchase or terms of service.
Read more about disputes in our documentation: